Ingredients you'll need: Dough- 655g 00 type flour or all purpose flour 45g whole wheat flour 14g fine sea salt 98g mature sourdough starter 490g water @ 90F
Sauce - 28 oz can peeled san marzano tomatoes, drained 2 cloves garlic peeled 2 tablespoons olive oil salt to taste
Sample Schedule for this recipe: 4:00 P.M Mix your dough
use hands for Rubo(?) method to develop gluten strength for 5-8 min until dough looks smooth
4:10 P.M. Bulk ferment
every 30 min stretch-and-fold from four sides 3 times
alternative (???): Cover and let rest for 30 minutes. Then perform a set of stretches and folds or slap and folds (see video for guidance). Do two sets of these stretches and folds total at 30-minute intervals.
let rest for remaining time
after bulk ferment use bench scraper due to stickiness) and rotate dough on wor bench
place dough in oiled bowl
6:40 P.M Refrigerate dough overnight (14 hours if you want to be precise) next day
8:40 A.M Shape dough balls
divide dough into 4 pieces
form ball and pinch to close it on one side. this side should be faced down
place balls on oiled baking pan
8:50 A.M. Proof dough balls 5 hours at 70-75F
let rise until doubled in volume???
1:00P.M. Dough is ready to bake with or you can refrigerate it for 1-2 days covered and bake with later.
**Attention Pizza Fans**: My pizza cookbook, Pizza Night, is now available for pre-order. Get your copy here: Pizza Night
What you need to make this recipe…:
…a sourdough starter. Ideally, you want to use your starter 4 to 6 hours after you feed it, when it has doubled in volume and is very bubbly and active. You can build a starter from scratch in just about 1 week. Or you can buy one. Here are three sources:
…time. Once your starter is ready to go, this recipe requires an initial 6 – 18 hour rise, followed by at least 6 hours in the fridge or up to 3 days.
Timing/Schedule:
The more I make sourdough, the more I realize that the timing of each bake depends so much on the time of year and the temperature of my kitchen. In the summer, because it is warm and humid, the first rise (bulk fermentation) of all my sourdoughs takes between 6 – 8 hours; in the winter it will take longer, 10 to 12 hours.
It is best to rely on visual cues. For the bulk fermentation, you want the dough to double or less than double: I now end my bulk fermentation when the dough has risen by 50% to 75% in volume. This is why I cannot recommend using a straight-sided vessel (as opposed to a bowl) enough. It makes gauging the first rise easier.
If at any point you are worried the dough will over-ferment — say, for example, the bulk fermentation is nearly complete but you are tired and want to go to bed — stick the vessel in the fridge and pick up the process in the morning. (Note: If your dough rises above double, don’t despair … my dough has tripled in volume during an overnight rise, and the resulting dough still had plenty of strength and spring.)
Schedule: I like mixing this dough in the evening, performing 4 stretch and folds before I go to bed (if time permits), then letting the dough complete its bulk fermentation at room temperature (68ºF) overnight or in the refrigerator (especially in the summer, when my kitchen is much warmer). In the morning, it’s typically ready to be portioned (if it rose at room temperature), transferred to quart containers, and stashed in the fridge. If I had let my dough spend time in the fridge for the bulk fermentation, I remove it in the morning, and let it complete its bulk fermentation at room temperature. Once complete, I portion the dough and stash it in the fridge. Sometimes I’ll use the dough that same evening; sometimes I’ll use it the following day or the next. I encourage using the dough within 3 days.
In short: If you want pizza for the weekend, mix your dough on either Wednesday or Thursday.
Water: If you live in a humid environment or if you are making this on a particularly humid day, consider starting with less water, such as 335 grams of water, which will bring the hydration down to 70%. This amount of water will still produce a light airy crust but the dough will be more manageable.
Flour choice:
Due to supply issues, I’ve been making this recipe with all-purpose flour, and it works beautifully. You absolutely can use bread flour or tipo 00 flour if you can get your hands on either. If you can’t, know that all-purpose (unbleached) flour works great here. If you use 00 flour, you’ll likely need to reduce the amount of water. I would start with 350 g, and adjust moving forward based on your results.
Parchment Paper: I bake my pizzas on parchment paper on my Baking Steel. Parchment allows for easy transfer from peel to steel.
Cast Iron Skillet: If you do not have a Steel or stone, you can use a cast iron skillet. Rub a half teaspoon of oil over its surface, transfer a stretched dough round to the skillet. Top as desired. Bake at 450ºF for about 15 minutes.
100 g sourdough starter, active and bubbly, see notes above
10 g salt
500 g all-purpose or bread flour
FOR EACH MARGHERITA PIZZA:
2 tablespoons tomato sauce
1 to 2 oz mozzarella
handful of grated Parmigiano Reggiano (less than an ounce)
drizzle olive oil
pinch sea salt
FOR EACH KALE AND CRÈME FRAICHE PIZZA:
extra-virgin olive oil
a couple handfuls of baby or Tuscan kale
1 to 2 cloves garlic
Sea salt, such as Maldon
2 tablespoons crème fraîche
grated Parmigiano Reggiano, about 1/4 to 1/3 cup
FOR EACH NAKED PIZZA WITH RAMP OR SCALLION OIL:
1/4 cup olive oil
1/4 cup minced scallions or ramps
1 teaspoon crushed red pepper flakes
1 to 2 tablespoons crème fraîche
handful grated Parmigiano Reggiano
sea salt
Cook Mode Prevent your screen from going dark
INSTRUCTIONS
Mix the dough. Place the starter, salt, and water in a large bowl. Stir with a spatula to combine — it doesn’t have to be uniformly mixed. Add the flour. Mix again until the flour is completely incorporated. Transfer to a straight-sided vessel (if you have one.) Cover vessel with tea towel or cloth bowl cover and let stand 30 minutes.
Stretch and fold: after 30 minutes have passed, reach into the vessel and pull the dough up and into the center. Turn the vessel quarter turns and continue this pulling 8 to 10 times. See video for guidance. Let the dough rest for another 30 minutes; then repeat the stretching and folding. If possible, repeat this cycle twice more for a total of 4 stretch and folds. By the 4th cycle, you will notice a huge difference in the texture of the dough: it will be smoother, stronger, and more elastic.
Bulk fermentation: Cover vessel with a tea towel or bowl cover and set aside to rise at room temperature (70ºF/21ºC) for 4 to 18 hours (the time will vary depending on the time of year, the strength of your starter, and the temperature of your kitchen; see notes above) or until the dough has roughly doubled in volume. (UPDATE: In the past I have recommended letting the dough rise until it doubles in volume. If you’ve had success with this, continue to let the dough double. Recently, I have been stopping the bulk fermentation when the dough increases by 50% in volume, and I feel my dough is even stronger in the end.) Note: Do not use your oven with the light on for the bulk fermentation — it is too warm for the dough. When determining when the bulk fermentation is done, it is best to rely on visual cues (doubling in volume) as opposed to time. A straight-sided vessel makes monitoring the bulk fermentation especially easy because it allows you to see when your dough has truly doubled.
Portion and shape: Turn the dough out onto a work surface and shape into a rough ball, using as much flour as needed — the dough will be sticky. Using a bench scraper, divide the dough into 4 equal portions. Sprinkle portions with flour. With floured hands, roll each portion into a ball, using the pinkie-edges of your hands to pinch the dough underneath each ball. Transfer each round of dough to a plastic quart container, cover, and store in fridge for at least 6 hours or up to 3 days or transfer to the freezer (see notes in post about thawing).
Make the pizzas: Pull out a round (or more) of dough from the fridge one hour before you plan on baking. Dust dough with flour and place on a floured work surface. Let sit untouched for about an hour (a little longer or shorter is fine). Place a Baking Steel or pizza stone in the top third of your oven. Set oven to 550ºF. Heat oven for at least 45 minutes but ideally 1 hour prior to baking.
Shape the dough: Gently shape dough into a 10-inch (roughly) round handling it as minimally as possible. (See video for guidance.) Lay a sheet of parchment paper on top of a pizza peel. Transfer the dough round to the parchment-lined peel.
Top and Bake
To make a classic Margherita-style pizza: Spread 2 tablespoons of tomato sauce over the surface of the dough. Top with mozzarella to taste. Sprinkle with parmesan to taste. Drizzle with olive oil. Sprinkle lightly with sea salt. Shimmy the pizza, parchment paper and all into the oven. Bake pizza until top is blistered, about 5-6 minutes. Transfer to cutting board. Sprinkle with basil, if you have it. Cut and serve. Discard parchment paper.
To make a kale and crème fraîche pizza: Place the kale in a small bowl, drizzle with olive oil, season with sea salt, and toss. Spoon crème fraîche over the dough leaving a 1/2-inch border or so—I use about a tablespoon per pizza. Sprinkle with minced garlic and a handful of grated Parmigiano Reggiano. Top with the kale. Shimmy the pizza, parchment paper and all into the oven. Bake pizza until top is blistered, about 5 – 6 minutes. Transfer to cutting board. Cut and serve. Discard parchment paper.
To make a naked pizza with scallion oil: Heat 1/4 cup olive oil in a skillet with 1/4 cup of minced scallions (or ramps!) and 1 teaspoon crushed red pepper flakes. Keep it over low heat while you make the pizza. Spoon crème fraîche over the dough leaving a 1/2-inch border or so—I use about a tablespoon per pizza. Sprinkle with a handful of grated parmesan. Shimmy the pizza, parchment paper and all into the oven. Bake pizza until top is blistered, about 5 – 6 minutes. Transfer to cutting board. At this point, the scallions should be starting to “frizzle”. If they aren’t, crank up the heat until the oil is sizzling. Spoon a few tablespoons of the hot oil over the pizza (you’ll have extra oil). Sprinkle with a pinch of sea salt. Cut and serve.
Adapted from my favorite yeasted, slow-rise focaccia recipe — overnight refrigerator focaccia — this recipe replaces the yeast with a sourdough starter.
UPDATE: Video guidance is here! Watch up above or click the link below in the recipe card.
What you need to make this recipe…:
…a sourdough starter. I bought mine from Breadtopia. It was easy to activate. There are no instructions on the package itself; follow the instructions on the video here.
…time. Once your starter is ready to go, this recipe requires an initial 4- 18 hour rise, followed by a second 4- to 6-hour second rise. After the initial rise (depending on the time of year and temperature of your kitchen), you can deflate the dough, and stick it in the fridge for 8 to 10 hours (maybe longer), which might help you regarding your schedule. Keep in mind, when you remove the dough from the fridge and transfer it to a pan, it will still need to rise for another 5- to 6- hours.
…water. Apparently, chlorine in water can adversely affect sourdough. Leaving water at room temperature for 24 hours will allow most of the chlorine to escape.When I am in the habit of making sourdough bread, I fill a large pitcher with water and leave it out at room temperature. I use this for my sourdough breads and starter. Truth be told, I’ve used water straight from the tap and have not noticed a difference.
Water quantity: Depending on where you live and the time of year, you may need to cut the water back. If you live in a humid environment, for instance, I would suggest starting with 430 g water. If you are not using bread flour, you also may need to cut the water back a bit.
Timing:
The more I make sourdough, the more I realize so much depends on the time of year and the temperature of my kitchen. In the summer, because it is so warm, the first rise (bulk fermentation) takes between 4 – 6 hours; in the winter the first rise takes 12 – 18 hours.
The key with this recipe is to make sure the first rise doesn’t go too long — you want the dough to nearly double. A straight sided vessel (as opposed to a bowl) makes gauging the first rise easier. (Note: If your dough rises above double, don’t despair … recently my dough tripled in volume during an overnight rise, and the resulting focaccia was still delicious, light, airy, etc.)
A few thoughts: If you are making this focaccia in the summer (northern hemisphere), use 50 g of starter and check the dough every couple of hours. If you are making this in the winter, use 100 g of starter, and plan for a long first rise.
I’ve been using King Arthur Flour’s special patent flour — bought a 50-lb. bag of it at Restaurant Depot. Its protein content, 12.7%, is the same as the protein content of its bread flour. I also have used all-purpose flour (11.7%) with success, but I recommend bread flour, which seems to be more reliable for people especially those living in humid climates. If you only have ap flour on hand, you may consider reducing the water a bit — bread flour absorbs slightly more liquid than all-purpose flour.
INGREDIENTS
50 g – 100 g (1/4 to 1/2 cup) active starter, see notes above
10 g (about 2.5 teaspoons) kosher salt
430 – 440 g water (1.75 cups – 1.75 cups + 2 tablespoons), room temperature, see notes above*
512 g (about 4 cups) bread flour, see notes above
3 tablespoons extra-virgin olive oil, divided, plus more for drizzling
Nice, flaky sea salt, such as Maldon
Cook Mode Prevent your screen from going dark
INSTRUCTIONS
Place the starter, salt, and water in a large bowl. Stir with a spatula to combine — it doesn’t have to be uniformly mixed. Add the flour. Mix again until the flour is completely incorporated.
If time permits, perform one “fold”: 30 minutes after you mix the dough, reach into the bowl and pull the dough up and into the center. Turn the bowl quarter turns and continue this pulling 8 to 10 times. See video for guidance.
Drizzle with a splash of olive oil and rub to coat. Cover bowl with a tea towel or bowl cover and set aside to rise at room temperature (70ºF/21ºC) for 4 to 18 hours (the time will vary depending on the time of year, the strength of your starter, and the temperature of your kitchen — in summer, for instance, my sourdoughs double in 6 hours; in winter, they double in 18 hours. Do not use an oven with the light on for the bulk fermentation — it will be too warm. It is best to rely on visual cues (doubling in volume) as opposed to time to determine when the bulk fermentation is done. A straight-sided vessel makes monitoring the bulk fermentation especially easy because it allows you to see when your dough has truly doubled.).
When dough has doubled, place 2 tablespoons of olive oil into a 9×13-inch pan. (I have been using this USA Pan, which I love. I have had no sticking issues. If you are using a glass pan, you may, as a precaution, want to butter it it first — I have had disasters with bread sticking when I’ve used oil alone with other baking vessels.)
Drizzle dough with a tablespoon of olive oil. Use your hand to gently deflate the dough and release it from the sides of the bowl. Gently scoop the dough into the center of the pool of oil in your prepared pan. Fold dough envelope style from top to bottom and side to side to create a rough rectangle. Turn dough over so seam-side is down. Video guidance here.
Rub top of dough with oil. Leave alone for 4 to 6 hours, uncovered, or until puffy and nearly doubled.
Heat oven to 425ºF. Rub hands lightly with oil, and using all ten fingers, press gently into the dough to dimple and stretch the dough to nearly fit the pan. Sprinkle generously with sea salt. Transfer pan to the oven and bake for about 25 minutes or until golden all around. Remove pan from oven and transfer bread to a cooling rack. Cool at least 20 minutes before slicing.
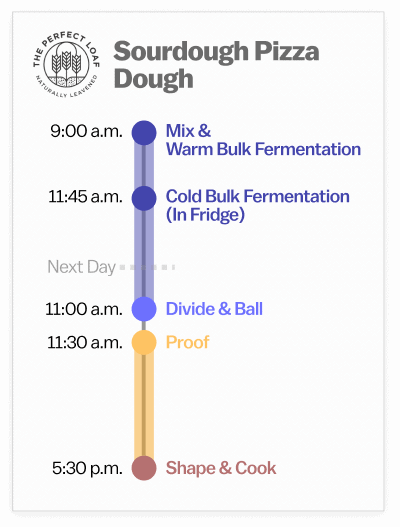
You can adjust the schedule for this flexible sourdough pizza dough to suit your schedule. The dough can be made over two days or stretched to three or four days proofing.
Or, you could mix at 5:00 p.m. as I have listed here, and instead of shaping them into balls the next day at 11:00 a.m., you could shape them before work and cook the pizzas right when you get home.
8 PM - The night before, mix the dough, cover the bowl, and let it sit at room temperature overnight.
8 AM - The next morning, perform one set of stretches and folds. Cover the bowl and place in the fridge until ready to cook.
5 PM - Remove the bowl of dough from the fridge.
5:30 PM - Cook pizzas.
TIPS FOR SUCCESS
If you do not have an oven-safe or cast iron skillet, start the pizza on the stovetop in a non-stick skillet. When the pizza is ready to go under the broiler, carefully slide the crust onto a baking sheet to finish it.
Remember, don't be afraid to generously flour the work surface and the dough while shaping the pizza crust. Anytime your hands start to stick, add more flour.
Have your pizza toppings ready to go before you shape the dough into the pizza crust. It only takes a few minutes on the stovetop before it's ready to pop into the oven to finish.
This recipe makes (4) 8" pizza crusts. The dough can be divided in half to make (2) 16" pizzas.
ADJUSTMENTS FOR HIGH HUMIDITY AND WARMER WEATHER
In warmer months, reduce the amount of water by 25 grams in the initial mix. If the dough seems too stiff, slowly add the remaining water until you achieve the correct hydration level.
You can adjust the flour measurements to 75g whole wheat flour and 425g all-purpose flour. Whole wheat needs more water than all-purpose, thus slightly reducing the hydration level of the dough.
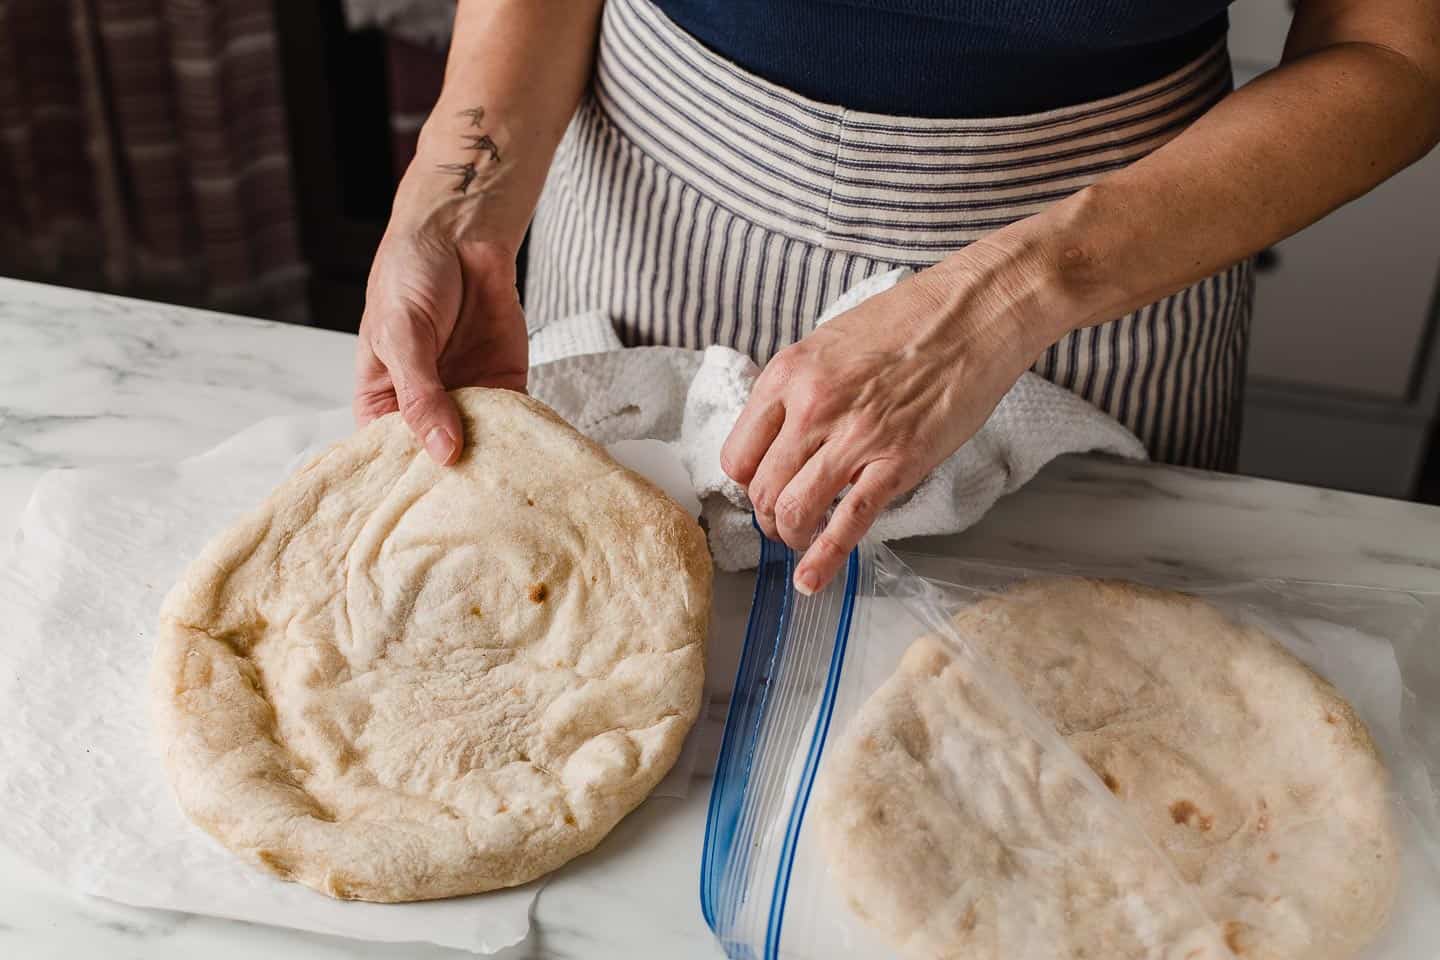
HOW TO FREEZE PIZZA DOUGH
To freeze unbaked pizza dough, form the dough into 4 balls. Coat them with oil to prevent sticking and place each one into an individual freezer bag. Make sure to remove any air from the bag. Store in the freezer for up to 3 months.
When ready to use, thaw the dough in your refrigerator for 12 hours or overnight. Once you're ready to bake, remove the dough from the refrigerator and bring it to room temperature. Shape the pizza crust and bake according to the directions.
You can also bake the crust and freeze it for up to 3 months for later use.
Shape the crust and cook in the cast iron skillet over medium-high heat for 5-6 minutes. Finish under the broiler for 1-2 minutes.
Let cool and freeze in a freezer-safe bag between sheets of parchment paper.
When ready to bake, preheat your oven to 400°F (204°C). Remove the crust from the freezer and place on a baking sheet. (No need to thaw.) Add desired toppings. Bake for about 15-20 minutes or until the crust is golden and toppings are cooked through.
Add the pizza crust ingredients to a large mixing bowl and use your hands to mix until they are fully incorporated. Cover the bowl and allow the dough to ferment at room temperature overnight.
THE NEXT MORNING
Perform a set of stretch and folds. Wet your hand with water to prevent the dough from sticking. While the dough is still in the bowl, gently pull one side of the dough up and over itself. Turn the bowl and repeat this on all sides of the dough until you turned the bowl full circle.
Cover the bowl and place in the fridge, up to 36 hours until ready to bake. (The dough can be used at this point to make your pizza, the cold ferment is optional.)
THAT NIGHT
Remove the dough and let rest on the counter for 30 minutes to come to room temperature.
Divide the dough into 4 equal pieces and on a generously floured work surface, shape each portion into ball shape. Cover the mounds with a tea towel let rest 30 minutes.
Turn on your oven's broiler and heat a cast iron skillet over medium to medium-high heat. While the skillet is preheating, use your hands to press a ball of dough into an 8" circle on a floured surface. Use more flour as needed to prevent sticking. (If you find the dough difficult to shape into a pizza crust, let it to rest on the counter for 15 minutes in order for the gluten to relax.)
When the skillet is hot, lay the circle of dough onto the skillet. Immediately place the sauce and toppings on the crust and cook for 5-6 minutes or until the bottom of the crust is starting to char.
Once the bottom has turned brown and charred, transfer the cast iron skillet to the broiler to finish baking the top of the pizza 2-4 minutes. Remove, slice and serve hot.
NOTES
This recipe has been EDITED on 12-15-20 from the original, with the following changes: water- reduced from 1 ½ cup (375g) to 1 ⅓ cup + 2 tablespoons (350g).
If you do not have an oven-safe or cast iron skillet, start the pizza on the stove-top in a non-stick skillet. (If it is not a non-stick skillet, spray a little cooking oil to prevent the crust from sticking.) When the pizza is ready to go under the broiler, carefully slide the crust onto a baking sheet to finish it.
8 ounces fresh mozzarella cheese, not packed in water blotted dry and torn into pieces
fresh basil leaves plus more for finishing
parmigiano-reggiano cheese optional
Tips for Success:
For added chewiness and crispiness (particularly if baking in a home oven), I’ve had more success with sourdough pizza dough made with almost equal amounts of traditional Type “00” flour and high-protein bread flour. This recipe has been tested extensively with Central Milling “00” Flour, but has also been prepared with Caputo (Italian brand). They do differ in protein levels, but both create great pizzas. For bread flour, I recommend King Arthur for similar results.
This pizza dough can be prepped a day ahead. Follow the pizza dough instructions above, but only allow the dough balls to proof at room temperature for 3 to 4 hours. Transfer the container to the fridge and refrigerate overnight. Allow the dough to rest at room temperature (72°F/22°C) for at least 2 to 3 hours before using the following day.
Example Baking Timeline:
Note: This sourdough pizza dough recipe requires a large quantity (250 g) of ripe sourdough starter. Scale up the previous night’s feeding, so a portion is ready to be used in the pizza dough.
9:00 AM – mix the pizza dough, cover and rest for 20 minutes.
9:20 AM – knead the dough briefly, cover and rest for 3 hours.
12:20 PM – shape the dough into pizza balls, place in a floured container, cover, and proof for at least 5 hours or until you’re ready to make pizza (they will hold for up to 4 additional hours if needed)
1-2 Tbsp additional oil for coating the dough bowl and the proofing pan
1/4 cup of cornmeal to dust the pizza peel
Baker's Percentages
85% tipo 00 flour
15% whole grain turkey red wheat flour
65% water
20% sourdough starter
2.3% olive oil
2% salt
Instructions
Levain
Prepare your 120g of starter by mixing 40g of starter with 40g of water and 40g of flour. This is a 1:1:1 starter preparation, but other builds are fine too. Mark your jar with a rubberband and let it sit at room temperature for 4-8 hours until roughly tripled.
Mixing and First Rise
Mix the ingredients, including the 120g of mature starter, together by hand, or in a mixer with the dough hook attachment, until everything is incorporated and forming a ball around the hook.
Scrape the dough out onto a floured counter and knead it for 3-5 minutes, adding a small amount of flour until the dough is manageable.
I prefer to hand knead the dough, but if you want to keep the dough in your mixer for 5-10 minutes until it passes the windowpane test, that is fine too. Covering it while it's still shaggy, and doing several rounds of stretching and folding over the course of a couple of hours is also an option.
Lightly oil a bowl, dab the "top" of your dough ball in the oil, then lay the bottom side down in the bowl and cover.
Let the dough rise until it has approximately doubled. I tend to leave the dough at room temperature for a few hours and then put it in the refrigerator for a day or so, and finally pull it out when it is fully risen or close to fully risen and just needing a few more hours at room temperature.
The bulk fermentation can be just a few hours if you use warm water and have a warm house or put the dough in a lit oven, or this can be five days if you use sleepy starter and put the dough in a 37F refrigerator. I did the latter recently, and the pizza was tasty-sour and the crust perfectly bubbly.
Preshape and Second Rise
When the bulk fermentation is finished, lightly oil a 9x13 baking pan and your counter.
Scrape out the dough onto the oiled counter, gently press out most of the air, and divide the dough into 4-5 pieces. The total dough weight is approximately 1140g. This makes five approx. 225g or four 285g pizzas. (You can go larger and smaller, but you may need to adjust cook time.)
Form each piece into a ball by folding the sides of the piece inward. Then hold the ball in one hand with the taut top on your palm, while you pinch the bottom pieces together with your other hand.
Place the balls in the oiled pan seam-side down, and cover or put the entire pan in a plastic bag. The final proof can be at room temperature for 45-90 minutes or in the refrigerator for 8-12 hours. Various combinations of room temperature and cold proofing work, and a lot depends on how warm the dough was when you shaped it, and if your room temperature is very warm. Even in a heat wave, I've not seen a big difference in pizza outcome when the first dough ball of a batch was formed into a pizza and cooked an hour before the last dough ball.
Topping Prep
45-90 minutes before the dough is finished proofing, set up your toppings and the area where you will be stretching and "decorating" your pizza. My preferred pizza sauce is NYTimes Classic Marinara plus 6 ounces of tomato paste (sometimes I skip the paste). I like to make it ahead of time, and simply pull it out of the refrigerator to warm up a bit when I'm setting up the toppings.
Sourdough Naan Flatbread
https://breadtopia.com/sourdough-naan-flatbread/
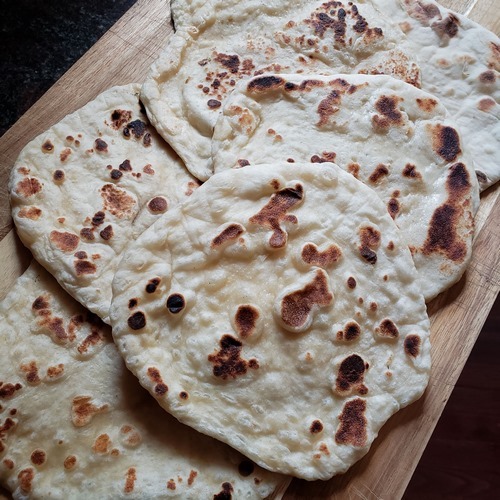
Sourdough Naan Flatbread
This is a stovetop and sourdough-leavened variation on Indian naan flatbread. This dough is easy to mix up, has a non-traditional cooking strategy of using a hot cast-iron pan. The flatbread is delicious when served with traditional Indian lentils (e.g. masoor dal) or used to dip in hummus or even make personal toaster-oven pizzas. They freeze well and you may find yourself doubling the batch to have more in stock.
Ingredients
275g organic all purpose flour (2 heaping cups) I often substitute in a portion of whole grain flour.
125g milk (~1/2 cup) Add more or less milk to accommodate different yogurt styles.
75g yogurt (1/4 cup)
5g salt (1 tsp)
Flour for your countertop
Oil or butter for your rolling pin
Optional: Minced garlic and cilantro or other herbs to add to the dough before rolling it flat, or to combine with melted butter and brush on the flatbreads after they are cooked.
Instructions
Mix all of the ingredients in a bowl and then hand-knead for a few minutes. Add extra flour if the dough is too sticky or more milk if it's too dry.
Cover the dough and let rise by 70-100%. This can take several days in the refrigerator or 4-8 hours at room temperature (or more), depending on the temperature and starter ripeness.
Scrape the dough onto a floured countertop, de-gas and divide it in eight pieces. I cut the dough like it is a pie. This is a good time to add minced garlic, chives or herbs if you want. Keep the pieces small, though, to not break the dough when you roll it flat.
Roll the triangles into eight balls, keeping track of which ball you made first so this can be the dough you fry first. I no longer do a final proof, finding that the bread is more bubbly this way. You simply need about 10 minutes between making the first ball and trying to roll it flat for the gluten to relax again.
On your stovetop, preheat a 10-inch or larger cast iron pan to "medium." You'll arrive at the perfect temperature for your pan and burner via trial and error.
Roll out your first ball to a little less than 1/4 inch thick . I very lightly flour my counter and very lightly oil my rolling pin.
Transfer the dough to the hot frying pan and cook each side for 1-2 minutes. Flip when the top of the dough bubbles and the sides curl under. You're aiming for brown spots, so adjust your heat accordingly.
Place the cooked naans on a rack to cool. You should have time to roll one dough while frying another. When all the naans are cooked and cool, cover or wrap them so they don’t dry out. You can also brush them with melted garlic-and-herb butter while they're warm if you want.
You can freeze and reheat the naans in the toaster.
Savory Sourdough Babka
https://breadtopia.com/savory-sourdough-babka/
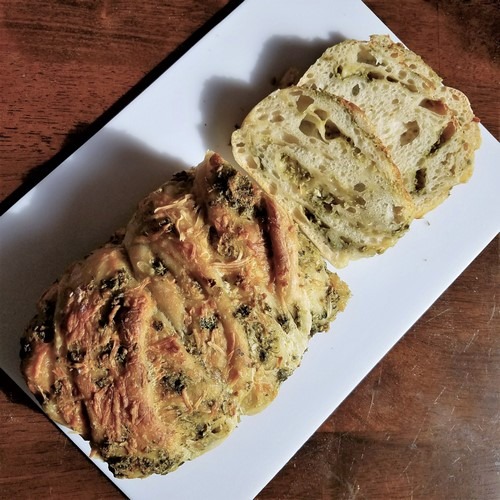
Savory Sourdough Babka
This Savory Sourdough Babka is made with the tangy dough of naan bread, and filled with cilantro, garlic, and cheese. The twisted and layered design of a babka maximizes delicious filling distribution and makes for a beautiful presentation that is actually quite easy to achieve.
(For a loaf with more separated layers, add 2 Tbsp of olive oil to this filling.)
Filling 2 (More Cheese and Garlic)
6 cloves of garlic
1 cup chopped cilantro
28g olive oil (2 Tbsp)
170g shredded mozzarella (1 3/4 cup or 6 oz)
50g grated parmesan (1/2 cup)
1-2 Tbsp additional parmesan to sprinkle on top of the loaf before baking
Filling 3 (Gouda and Scallion)
2 large stalks of scallions chopped
120g smoked gouda chopped (4 slices)
Filling 4 (Chocolate and Cinnamon)
71g softened unsalted butter (5 Tbsp)
56g sugar (1/4 cup)
20g cocoa powder (1/6 cup)
1/4 tsp ground cinnamon
85g bittersweet chocolate chips or chopped (heaping 1/2 cup or 3 ounces)
Dough Notes
I like for some portion of the flour and/or starter to be whole grain flour. One version I made was with whole grain rye starter, and this dough was a little softer and less elastic to handle.
Your starter does not have to be at peak activity. Somewhat dormant starter will simply cause the dough to rise slower. That said, I never tried the recipe with extremely unfed starter.
Kefir milk instead of yogurt and milk works well, but requires a little more flour (1-2 Tbsp). Likewise, you might add a little more milk (1-2 Tbsp) if you are using a thick Greek-style yogurt.
I used low fat and/or full fat yogurt and milk, but I believe non-fat would perform fine.
Instructions
Mix all of the dough ingredients together. The dough will be slightly tacky.
Either let rise slowly in the refrigerator for 2-3 days, or set out at room temperature for 4-6 hours. Any combination of room temperature and cold retarding is fine. For the longer cold fermentation, you might flip the dough after a day or so to prevent a dryer top layer. The dough should grow to be about 150% the original size.
When your dough is finished with the bulk fermentation, prepare your filling. The savory fillings can be done in a food processor, blender or by hand. The chocolate-cinnamon filling is best done in a stand mixer (paddle attachment) or by hand.
Scrape the dough onto a floured counter. Flour the top of the dough and press it into a rectangle, roughly 10x13 inches.
Flour the top of the dough again, and flip it over. Then lightly flour the new top of the dough, gently brushing the flour onto the surface of the dough just so it isn't tacky. This flipping and flouring is to make rolling and cutting the dough easier.
Spread the filling on the dough, leaving about 1/2 inch empty on one of the short sides. You can dampen this stripe with a wet fingertip to help adhesion.
Roll from the dry short side, and let the rolled dough rest on the seam for a few minutes.
Line a loaf pan with parchment paper.
Using kitchen scissors (or a knife), cut down the middle of the roll.
Make an X with the two strands of dough (see gallery below), then twist the top strand under the bottom strand. Do this both above and below the X. Pinch the ends together.
Using a bench scraper and/or spatula, scoop up the twisted dough and place it into the parchment-lined loaf pan. Your long twist will scrunch up during this process, allowing it to fit into the loaf pan.
Cover and let proof for about an hour at room temperature, or 8-10 hours in the coldest part of your refrigerator.
Preheat your oven to 325F.
Brush the loaf with milk (or egg) and sprinkle with more cheese if you want.
Bake uncovered for 60 minutes or until the inside of the loaf is above 190F. Let cool in the pan on a rack for about 30 minutes, then remove from the pan and peel off the parchment paper.
Instructions for Making Naan
At the end of the bulk ferment in the instructions above, scrape the dough out onto a lightly floured counter.
Roll the dough into a tube and cut it in 8-10 pieces (~680g total dough weight).
Start warming up a cast iron frying pan 10" or bigger on your stove at medium heat.
Roll out a dough piece into a circle (ish) shape about 1/4 inch thick. Flour your rolling pin and counter as needed.
Brush the top of the rolled-out dough with water.
Place in the hot frying pan, water side down.
When the naan has bubbles all over the top and is starting to curl under at the edges, then flip it over.
Optional: You can brush the naan with butter before flipping, but if you find your brush is popping bubbles, wait until the naan is already cooked for this step or skip it altogether if you want.
Cook until both sides have dark golden brown areas. You can roll out each naan while cooking the previous naan and be done in about 20 minutes. Keeping the process moving also prevents the pan from overheating. You can also lower the heat if you fall behind. Your first naan might be a little unattractive as you gauge how hot you want your pan to be and when to flip.
Cool on a rack. You can serve immediately, store loosely wrapped in paper or plastic on the counter, or freeze in a plastic bag with small pieces of parchment paper between each flatbread.